My name is Jena, and I've been nick-named the Vista Print Goddess.
Feel free to email me through the contact form on the home page.
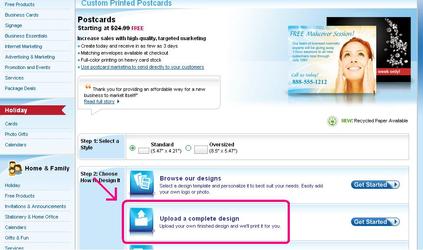
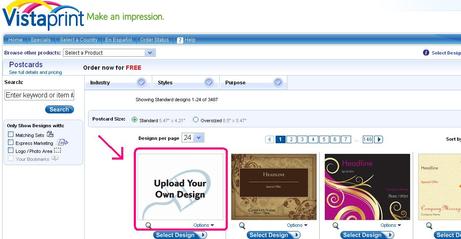
Can't find a pre-existing VP design that you love? Make your own!
Something I learned, early on in the wedding planning process, is that I'm. completely. retentive. Srsly. I need to have creative control over everything. I just felt/feel like the items I make reflect on me, and darnit, I want to look fabulous. One of those, "if you want something done right, do it yourself," type feelings.
So I know that you can make a Power Point presentation, and save it as a jpg. And hey, guess what, VP takes jpg uploads. It's usually called "Upload a complete design" or can be added in whichever selection (it's usually first, on each item's page).
So I know that you can make a Power Point presentation, and save it as a jpg. And hey, guess what, VP takes jpg uploads. It's usually called "Upload a complete design" or can be added in whichever selection (it's usually first, on each item's page).
 |
 |
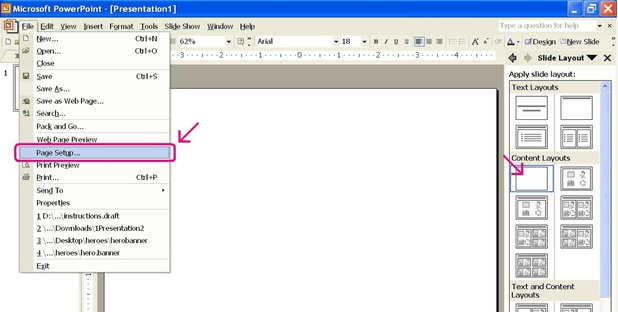
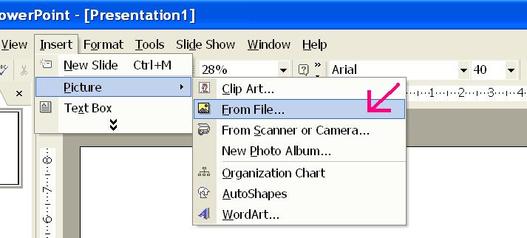
We're going to design our own postcard.
As you can see, inside the hot pink box, you need to go to File, then Page Setup...
-I've also added a pink arrow to show how you make a completely blank slide.
As you can see, inside the hot pink box, you need to go to File, then Page Setup...
-I've also added a pink arrow to show how you make a completely blank slide.
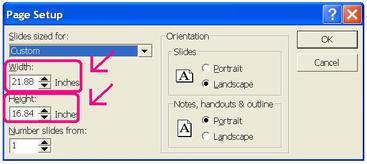
The reason we need to change the slide size, is to maintain the image quality after saving and uploading onto the VP site. We're going to ensure this by making our slide four times larger than what the postcard actually measures. A VP post card measures 5.47" by 4.21" - four times this gives us 21.88" wide and 16.84" tall.
Hit OK. It doesn't look any different, right? That's okay, it's good, even. Who wants to work with something that looks that big?
Hit OK. It doesn't look any different, right? That's okay, it's good, even. Who wants to work with something that looks that big?
What do we want to make the postcard of? I'm just going to do a mock-up Save the Date, using a picture from our E-pics session.
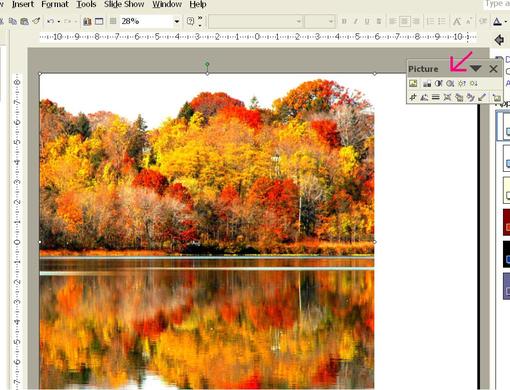
I'm going to use this foliage picture as a back drop for the STD. I've made it as big as I could, while keeping it inside the measured parameters. It doesn't fit nicely, so I'm going to crop it to the right dimensions. You need the Picture Toolbar for this, and you may need to right click on the picture to get it.
The funny little pair of xx is the crop tool. Bottom left hand corner on the toolbar. I decided to crop some off the top and some off the bottom, to make it fit better. To crop, you want to push the little "T" shapes in. Drag the corners to make the image larger, crop again, until the background picture fills the slide. I also want the trees to be a little more subdued.
The funny little pair of xx is the crop tool. Bottom left hand corner on the toolbar. I decided to crop some off the top and some off the bottom, to make it fit better. To crop, you want to push the little "T" shapes in. Drag the corners to make the image larger, crop again, until the background picture fills the slide. I also want the trees to be a little more subdued.

Again, you want the Picture toolbar. I used the "Less Contrast" button (fourth one over on the top for me). I hit the button several times, until it was light enough for me.
Then I inserted another image, this time, the E-pic I wanted to use.
Then I inserted another image, this time, the E-pic I wanted to use.
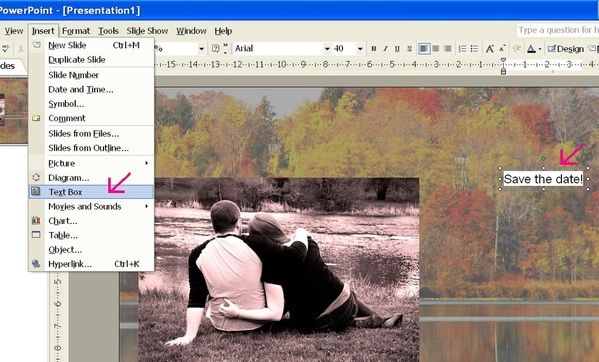
Now it's time to add some text. Inserting a text box is just like inserting a picture.
Click within the text box, and start typing. I'm going to change the font and size.
Click within the text box, and start typing. I'm going to change the font and size.
Add as many text boxes as you need, to get all the information that you want on the card. You can change the font, size, colour, etc.
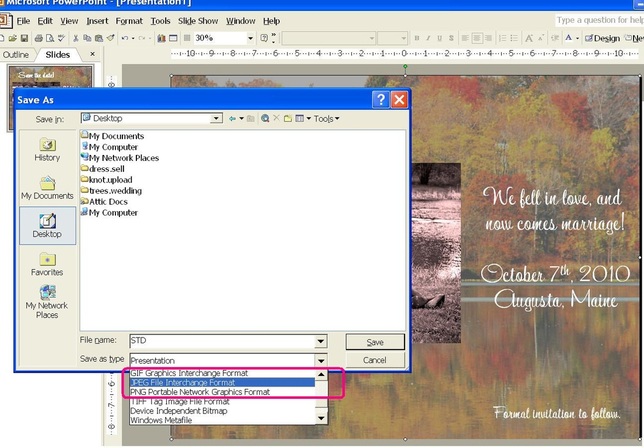
Then go to File -> Save As. Give it a name, and change "Save as Type" to jpg.
I suggest saving it as a PPT as well, in case you need to go back to it and make changes.
Then go to File -> Save As. Give it a name, and change "Save as Type" to jpg.
I suggest saving it as a PPT as well, in case you need to go back to it and make changes.
It's ready to upload to VistaPrint. Go to your email, find the best email offer (free uploads, free postcards), and click on the free postcards. It will open VP to the postcard page. Upload a complete design. It will give you a button labeled "Choose file." Find the pc you just made, and upload it.
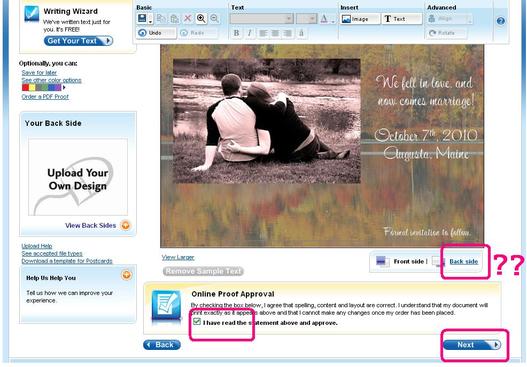
If you want a blank back, you just check the Online Proof Approval, and hit next. If you want a back side, you can upload another image. Black and white or greyscale are both free.
You're ready to check out. :) Order early, and choose the slow shipping to save the most.
If you want a blank back, you just check the Online Proof Approval, and hit next. If you want a back side, you can upload another image. Black and white or greyscale are both free.
You're ready to check out. :) Order early, and choose the slow shipping to save the most.
